Vol. 20257 min read
Building Oryn: A Full-Stack AI Chatbot with React, Node.js, and OpenAI
How I built an intelligent conversational agent using modern JavaScript and OpenAI's API: architecture, streaming responses, and the tradeoffs that mattered.
First published on Medium (opens in new tab), 6 Sept 2025.
Contents
Introduction
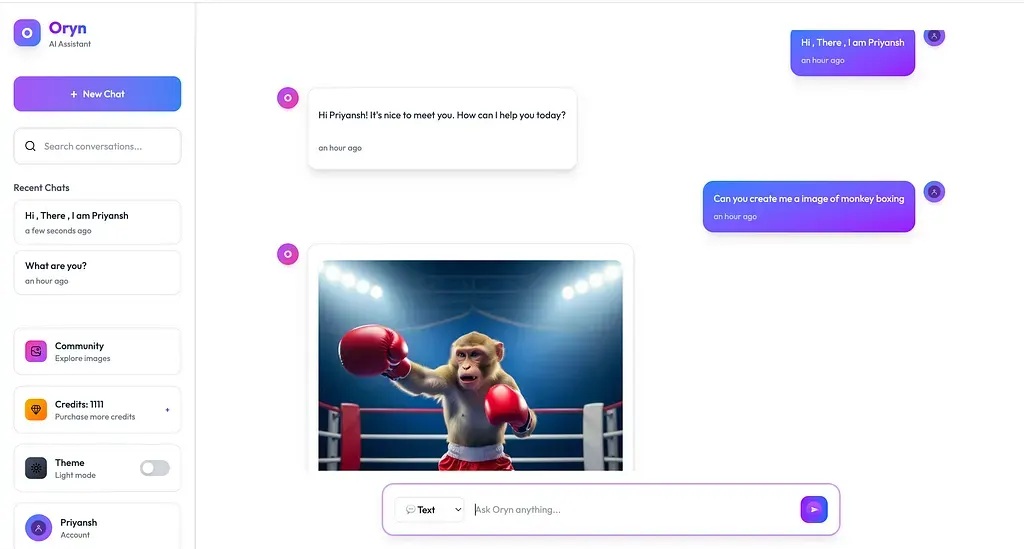
In today’s AI-driven world, chatbots have become essential tools for businesses and developers alike. I recently embarked on a journey to build Oryn, a full-stack AI chatbot that goes beyond simple text responses to include image generation, user management, and a credit-based system. This article chronicles my development process, the challenges I faced, and the solutions I implemented.
Project Overview
Oryn is a modern AI chatbot application that combines the power of OpenAI’s GPT and DALL-E models to provide both conversational AI and image generation capabilities. The application features a sleek, responsive interface with dark/light theme support, user authentication, and a credit system for API usage management.
Key Features
- 🤖 Real-time AI Chat powered by OpenAI GPT
- 🎨 AI Image Generation using DALL-E
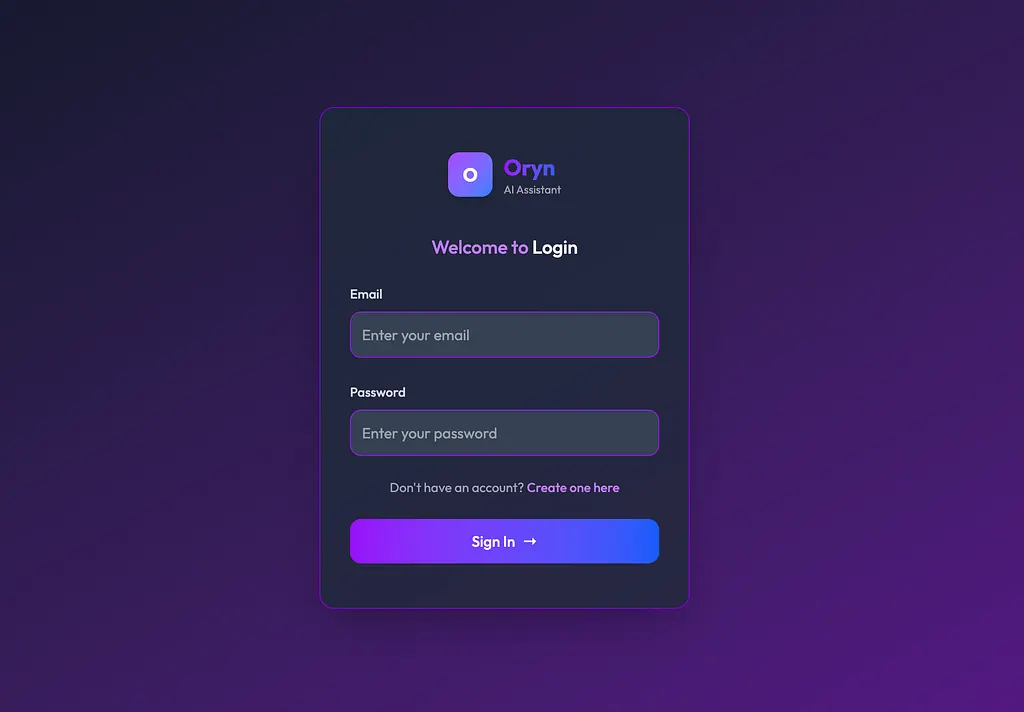
- 👤 User Authentication with JWT
- 💳 Credit System for API usage tracking
- 🖼️ Community Gallery for shared images
- 📱 Responsive Design for all devices
- Dark/Light Theme support
- Secure Backend with MongoDB
🛠️ Tech Stack
Frontend
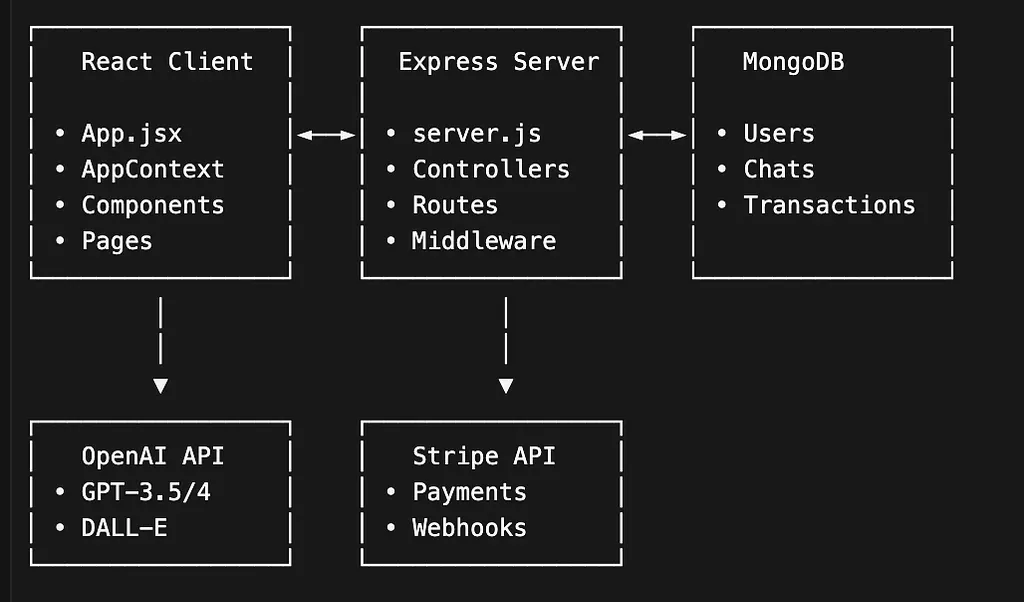
- React 18 — Modern UI library
- Vite — Fast build tool and dev server
- Tailwind CSS — Utility-first CSS framework
- React Router DOM — Client-side routing
- Axios — HTTP client for API calls
- React Hot Toast — Notification system
Backend
- Node.js — JavaScript runtime
- Express.js — Web framework
- MongoDB — NoSQL database
- Mongoose — MongoDB object modeling
- JWT — Authentication tokens
- bcryptjs — Password hashing
External Services
- OpenAI API — GPT and DALL-E integration
- Stripe — Payment processing
- ImageKit — Image hosting and optimization
- Vercel — Deployment platform
🏗️ Architecture Overview
🚀 Development Process
Phase 1: Project Setup and Authentication
I started by setting up the basic project structure with separate client and server directories. The authentication system was one of the first features I implemented, as it’s crucial for user management and API access control.
// User registration endpoint
app.post('/api/user/register', async (req, res) => {
  try {
  const { name, email, password } = req.body;
  const hashedPassword = await bcrypt.hash(password, 10);
  const user = new User({ name, email, password: hashedPassword });
  await user.save();
  res.status(201).json({ success: true, user });
  } catch (error) {
  res.status(400).json({ success: false, message: error.message });
  }
});
Phase 2: Chat Interface and AI Integration
The core chat functionality required careful state management and real-time updates. I used React Context for global state management and implemented a clean message flow.
// Message sending function
const sendMessage = async (message, mode = 'chat') => {
  try {
    const { data } = await axios.post(`/api/message/${mode}`, {
    message,
    chatId: selectedChat?._id
    }, { headers: { Authorization: token } });
    // Update UI with response
    setSelectedChat(prev => ({
    …prev,
    messages: […prev.messages, data.message]}));
  } catch (error) {
    toast.error('Failed to send message');
  }
};
Phase 3: Image Generation and Credit System
Implementing DALL-E integration was challenging due to the different API structure and response handling. I also needed to create a credit system to manage API usage costs.
// Image generation endpoint
const generateImage = async (req, res) => {
  try {
    const { prompt } = req.body;
    const response = await openai.images.generate({
    model: "dall-e-3",
    prompt: prompt,
    n: 1,
    size: "1024x1024"
    });
    // Upload to ImageKit
    const imageUrl = await uploadToImageKit(response.data[0].url);
    // Deduct credits
    await User.findByIdAndUpdate(req.user.id, {
    $inc: { credits: -10 }
    });
    res.json({ success: true, imageUrl });
  } catch (error) {
    res.status(500).json({ success: false, message: error.message });
  }
 };
/🐛 Challenges Faced and Solutions
Challenge 1: Case Sensitivity in Import Paths
Problem: The build was failing on Vercel due to case sensitivity issues with import paths.
// ❌ This caused build errors
import Sidebar from "./components/SideBar";
// ✅ Fixed version
import Sidebar from "./components/Sidebar.js";
Solution: I learned that Vercel’s build process is case-sensitive, unlike local development. I had to ensure all import paths matched the exact file names.
Challenge 2: State Management Complexity
Problem: Managing chat state, user authentication, and API calls across multiple components was becoming complex.Solution: I implemented a centralized AppContext that handles all global state and provides clean functions for components to use.
// AppContext.jsx
export const AppContextProvider = ({ children }) => {
  const [user, setUser] = useState(null);
  const [chats, setChats] = useState([]);
  const [selectedChat, setSelectedChat] = useState(null);
  const fetchUser = async () => {
  // Centralized user fetching logic
  };
  const sendMessage = async (message, mode) => {
  // Centralized message sending logic
  };
  return (
  <AppContext.Provider value={{
  user, chats, selectedChat,
  fetchUser, sendMessage
  }}>
    {children}
  </AppContext.Provider>
  );
};
Challenge 3: Real-time UI Updates
Problem: The UI wasn’t updating immediately after sending messages or generating images.Solution: I implemented optimistic updates and proper state management to ensure the UI responds immediately to user actions.
Challenge 4: Error Handling and User Experience
Problem: API errors weren’t being handled gracefully, leading to poor user experience.Solution: I implemented comprehensive error handling with toast notifications and fallback states.
// Error handling with toast notifications
const sendMessage = async (message) => {
  try {
    setLoading(true);
    const response = await apiCall(message);
    // Update UI
  } catch (error) {
    toast.error(error.response?.data?.message || 'Something went wrong');
  } finally {
    setLoading(false);
  }
};
Challenge 5: Deployment and Environment Configuration
Problem: The application worked locally but failed to deploy due to environment variable issues.Solution: I created proper environment configuration files and ensured all necessary variables were set in the deployment platform.
// .env file
VITE_API_URL=https://your-api-url.vercel.app
MONGODB_URI=your-mongodb-connection-string
JWT_SECRET=your-jwt-secret
OPENAI_API_KEY=your-openai-key
📱 User Interface Design
The UI was designed with a mobile-first approach, ensuring a great experience across all devices. I used Tailwind CSS for rapid styling and implemented a clean, modern design.
Key UI Components
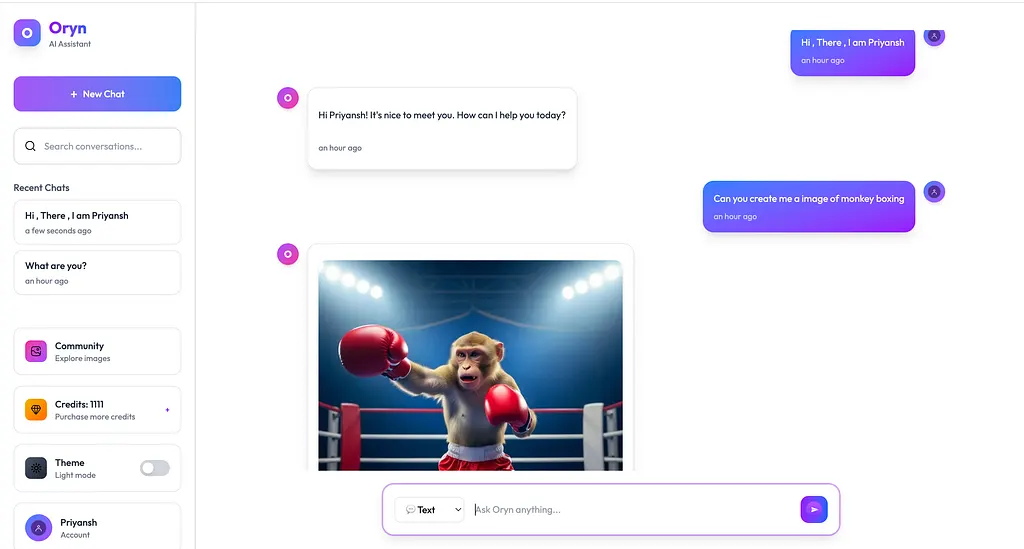
- Sidebar — Navigation and chat history
- ChatBox — Main chat interface
- Message — Individual message component
- Login/Register — Authentication forms
- Community — Image gallery
- Credits — Credit management
🔒 Security Implementation
Security was a top priority throughout development. I implemented several security measures:
- JWT Authentication — Secure token-based authentication
- Password Hashing — bcryptjs for password security
- CORS Configuration — Proper cross-origin resource sharing
- Input Validation — Server-side validation for all inputs
- Error Handling — Secure error messages without sensitive data exposure
📊 Performance Optimizations
To ensure smooth performance, I implemented several optimizations:
- Code Splitting — Lazy loading of components
- Image Optimization — ImageKit for optimized image delivery
- State Management — Efficient state updates
- API Caching — Caching frequently accessed data
- Bundle Optimization — Vite’s built-in optimizations
Deployment Process
The application is deployed on Vercel with the following setup:
Frontend Deployment
- Connected to GitHub repository
- Automatic deployments on push to main branch
- Environment variables configured
- Custom domain setup
Backend Deployment
- Serverless functions on Vercel
- MongoDB Atlas for database
- External API integrations
📈 Results and Metrics
The final application includes:
- ✅ 100% Responsive Design — Works on all devices
- ✅ Real-time Chat — Instant message delivery
- ✅ Image Generation — AI-powered image creation
- ✅ User Management — Complete authentication system
- ✅ Credit System — Usage tracking and payments
- ✅ Community Features — Shared image gallery
- ✅ Theme Support — Dark and light modes
🎓 Key Learnings
This project taught me several valuable lessons:
- State Management — Proper state management is crucial for complex applications
- Error Handling — Comprehensive error handling improves user experience
- API Integration — Working with external APIs requires careful error handling
- Deployment — Environment configuration is critical for successful deployment
- User Experience — Small details like loading states and animations matter
🔮 Future Enhancements
Planned improvements include:
- Voice Messages — Audio input/output capabilities
- File Uploads — Support for document and image uploads
- Chat Export — Export chat history
- Advanced AI Models — Integration with newer AI models
- Real-time Collaboration — Multi-user chat rooms
- Mobile App — Native mobile application
Development Setup
To run this project locally:
# Clone the repository
git clone https://github.com/priyansh18/Oryn.git
# Install dependencies
cd client && npm install
cd ../server && npm install
# Set up environment variables
cp .env.example .env
# Start development servers
npm run dev # Frontend
npm run server # Backend
🌐 Live Demo
- Live Application: https://oryn.priyanshsinghal.com/
- GitHub Repository: https://github.com/priyansh18/Oryn
Try the live demo to experience the full AI chatbot functionality with real-time chat and image generation!
📚 Resources and Documentation
- React Documentation
- Express.js Guide
- MongoDB Documentation
- OpenAI API Reference
- Tailwind CSS Docs
- GreatStack YouTube Channel — Original tutorial inspiration
🤝 Contributing
I welcome contributions to this project! Please feel free to:
- Report bugs
- Suggest new features
- Submit pull requests
- Improve documentation
📞 Contact
If you have any questions about this project or would like to collaborate, feel free to reach out:
- GitHub: @priyansh18
- Project Repository: https://github.com/priyansh18/Oryn
- Live Demo: https://oryn.priyanshsinghal.com/
🎉 Conclusion
Building Oryn was an incredible learning experience that taught me the intricacies of full-stack development, AI integration, and modern web technologies. The project successfully combines multiple complex systems into a cohesive, user-friendly application.The challenges I faced along the way only made the final product stronger, and I’m excited to continue improving and expanding its capabilities. Whether you’re a developer looking to build similar applications or someone interested in AI-powered tools, I hope this article provides valuable insights into the development process.Happy coding! 🚀
This article was written as part of documenting the development process of the Oryn AI Chatbot project. All code examples and solutions are based on real implementation challenges and solutions.
📸 Screenshots
Login Page
Main Chat Interface
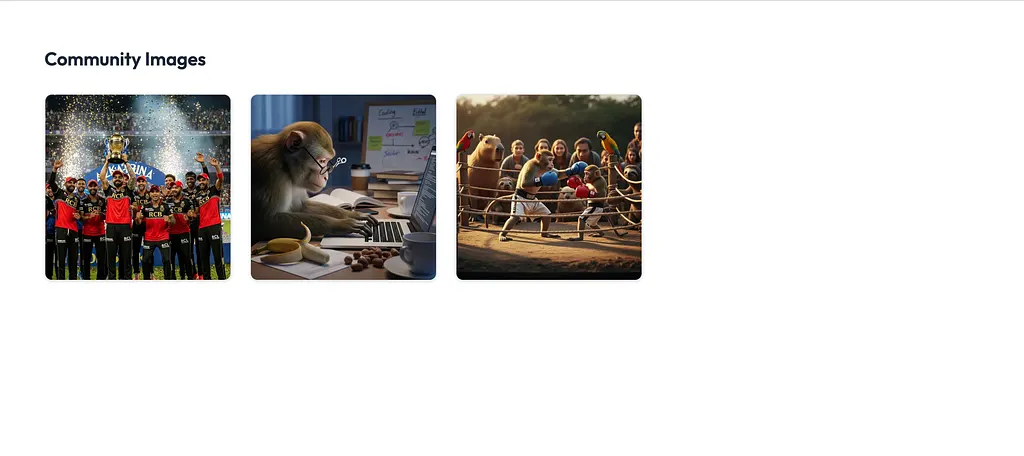
AI Image Generation/Community Gallery
Credit Plans
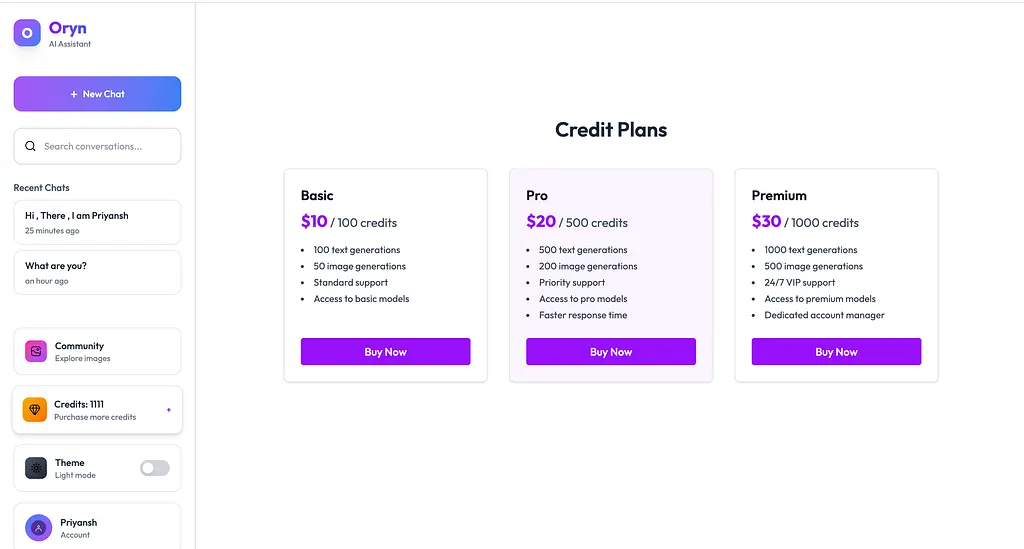
All screenshots are from the live application at https://oryn.priyanshsinghal.com/